It's a nice day for a White Wedding (Cake)!
This post contains affiliated links. If you make a purchase from one of these links we may receive a small commission for referring you. Thank you for visiting.
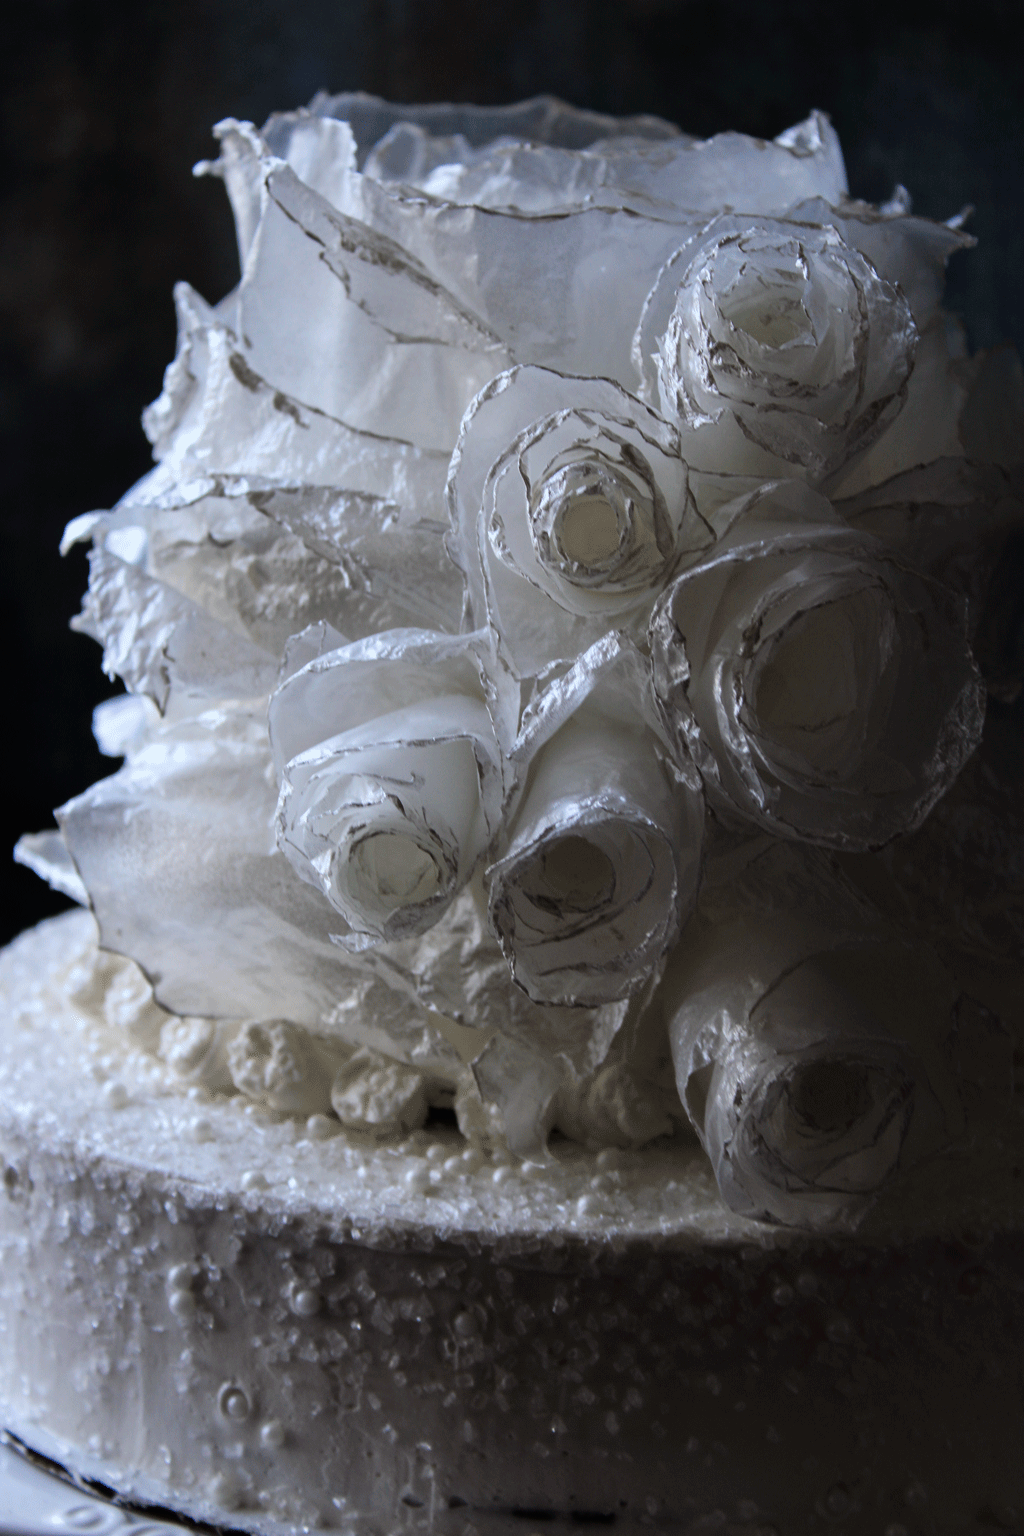
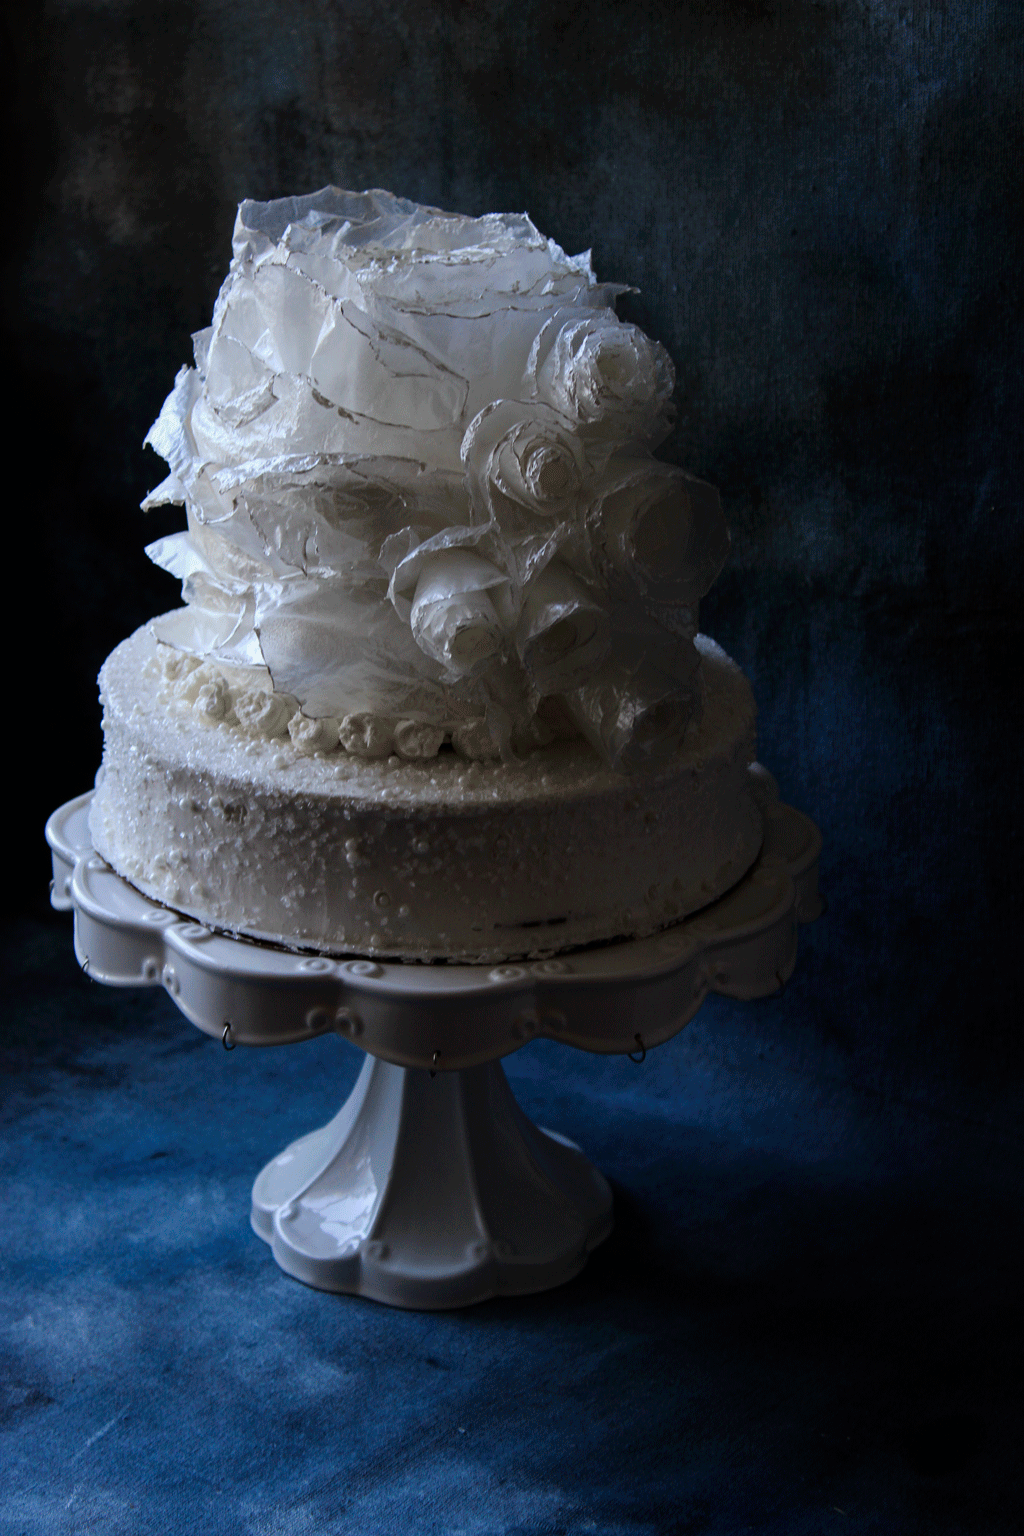
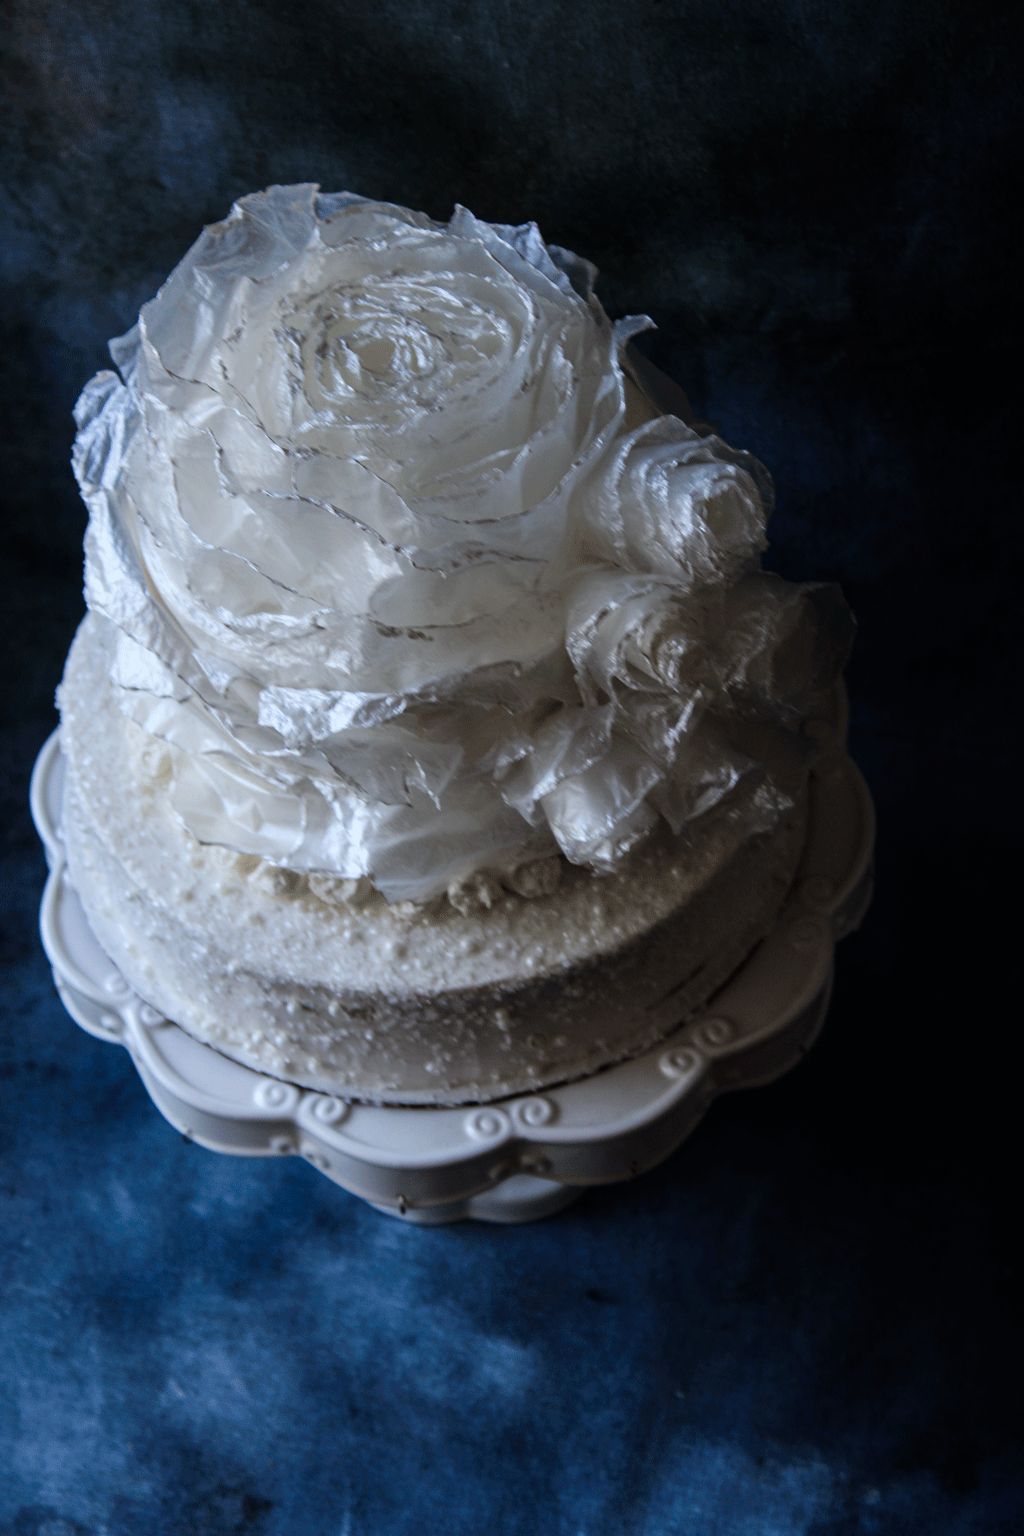
“Dedicated to Sherrie & Lynn. Layers of sheer iridescent petals, drenched in pearls & graced with crystals.”
White Wedding Cake with Italian Buttercream & Raspberry Coulis
We take you from baking cake layers all the way through plating in this instruction wedding cake tutorial.
makes to tiers | 2-layers of 9” & 3-layers of 6”
White wedding cake.
2 boxes of Classic Vanilla (white cake mix)
7 egg whites + 1 whole egg
1 cup butter, melted & cooled
2 cups whole milk
1/2 cup sour cream (full fat)
1 tsp. almond emulsification
Pastry Cream.
1 1/4 cups heavy cream
7 egg yolks
1/3 cup sugar
2 Tbsp. butter
1 tsp. vanilla
1/4 tsp. almond emulsification
Raspberry Coulis.
4 cups frozen raspberries
1/3-1/2 cup sugar
zest from 1 lemon
juice from 1/2 of a lemon
1/4 cup water
Dessert syrup.
1/3 cup sugar
1/4 cup water
1/2 tsp. vanilla
1/4 cup Grand Marnier
Italian Meringue butter cream.
4 egg whites from grade A large eggs
pinch salt
1/2 tsp. cream of tarter
1/3 cup super fine sugar
1 cup sugar
1/3 cup water
1 lb. butter, softened (room temperature but not melted)
1 tsp. vanilla
Cake decorations.
Tools & Supplies.
cake boards; 2-9” & 3-6” (or buy large & cut to size)
parchment paper
cake spatula (the rotating cake stand above comes with this tool)
fine tip paint brush
free standing mixing such as a kitchenaid
rubber spatula
This cake was quite the undertaking. There are many steps. For that reason I choose to spread this event over a four day period. You do not need to do it in the order in which I did mine, however you will need a minimum of two full days to pull it all off.
Day 1
1.) Make individual rice paper roses. I go into more depth in the description below with illustrations. But I highly recommend that you follow the tutorial that I used which inspired this cake design from The Cake Craftery.
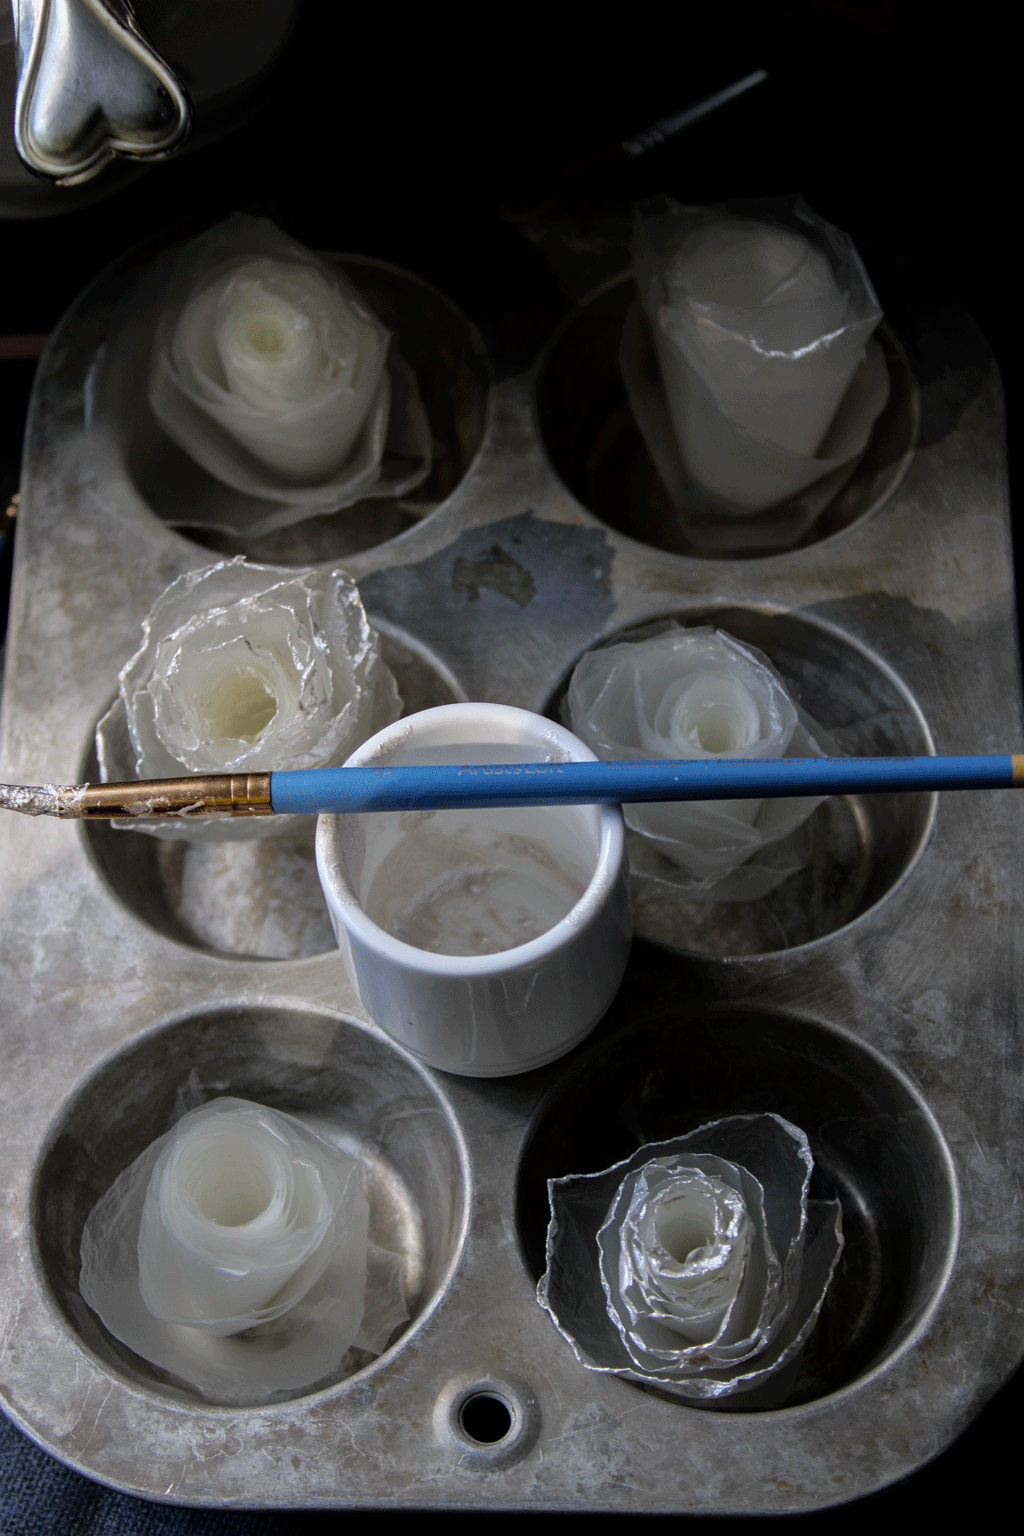
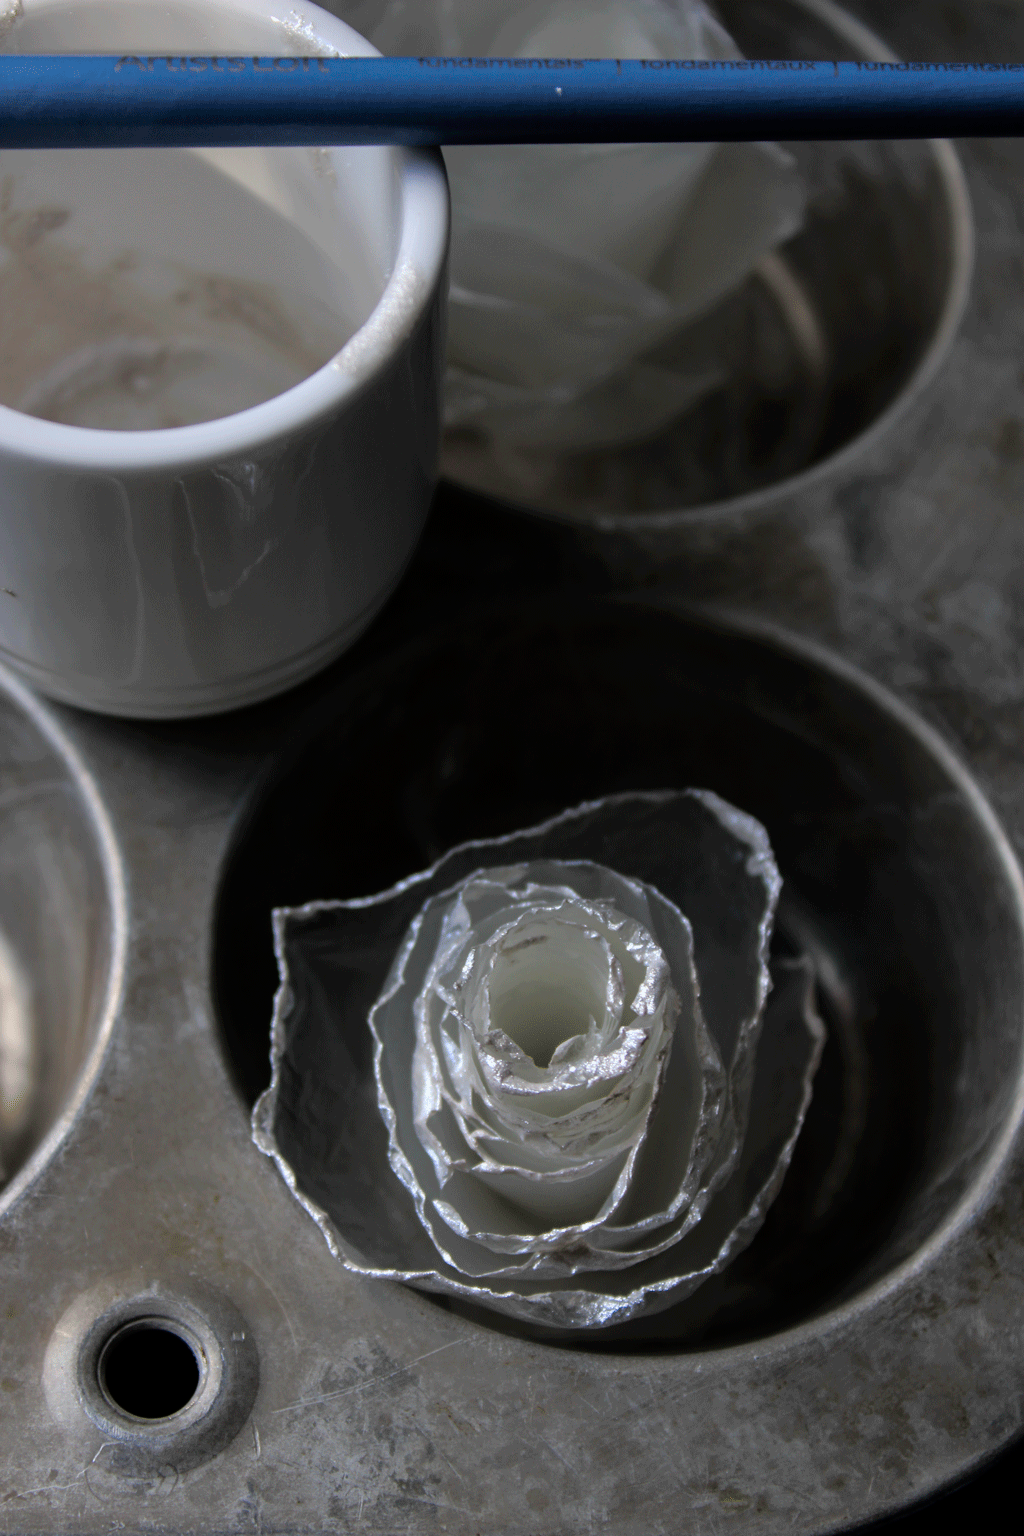
For six roses you will need six pieces of rice paper, scissors, vodka in a small spritz bottle, a fine paint brush & edible dust. Use a plate to draw a circle on each piece of rice paper, then cut out circle (save scraps in a zip lock bag). Cut circles into a spiral & roll each spiral up from outside edge working inward, allow it to un-spiral into a rose shape then spritz vodka on the very edge to hold the rose together. Here is the wonderful tutorial by The Cake Craftery I found that illustrates how to make a rice paper rose cake. I highly recommend that you watch the tutorial first, as it’s almost impossible to describe with words you really need a visual aid.
Notes: The rice paper I ordered was from Amazon & is a different product than that used in the tutorial. Mine produced a more delicate & iridescent effect however the product used in The Cake Craftery’s tutorial; a wafer paper made from potato starch & flavored with vanilla, looks like it’s easier to work with & bit sturdier.
2.) Bake cake layers & freeze. Preheat oven to 350f. & prepare listed cake pans by placing a piece of measured parchment in the bottom of each then greasing & flouring. Using a kitchenaid or other free standing mixer, combine listed ingredients & stir with a spoon or spatula to combine then whip on medium speed for two minutes. Divide the batter between pans & bake until golden brown & the center bounces back when touched, about 25-30 minutes. Insert a tooth pick into the center of each cake to ensure it’s properly cooked, you want tender crumbs on the tooth pick not batter. Allow layers to cool for 10 minutes then run a knife around the sides of each layer & turn out onto cake boards. Cover with plastic wrap while still warm & freeze.
Notes: I read this tip on freezing warm cake layers to hold in moisture & it works like a charm.
3.) Make your pastry cream. In a small sauce pan, over medium, heat heavy cream until very hot but not boiling. In a medium bowl whisk together egg yolks & sugar. In a slow steady stream, whisk hot cream into egg yolk & sugar then return mixture back to the sauce pan. Lower heat & continue to cook, stirring constantly until thickened. Remove from heat & whisk in butter, vanilla & almond. Cover tightly & refrigerate until ready for use.
day 2
1.) Prepare your raspberry coulis. This is just a simple raspberry sauce (with seeds removed) but it accentuates a white cake with a vivid blush of color & an exquisite tartness. Place all ingredients (sugar to taste, begin with a 1/3, add more if desired) in a medium sauce pan & cook stirring frequently over low to medium heat for about 10 minutes. Remove from heat. When cool enough to handle strain the sauce through a fine mesh sieve. This will take several minutes of pushing & stirring the raspberries using either a small spatula or clean hands. Refrigerate until ready for use.
2.) Prepare your dessert syrup. Combine sugar & water in a small sauce pan, stir to combine. Bring to a boil over medium heat & cook for 2 minutes. Remove from heat then stir in vanilla & Grand Marnier. You can leave this at room temperature but cover.
day 3
1.) Make the Italian meringue buttercream. Please refer to the notes, illustrations (listed below) & watch the tutorial link (above)prior to beginning. Very carefully separate egg yolks from whites (reserve yolks for another purpose). You can not have any trace yolk in the whites or they will not form peaks. Set whites aside to come to room temperature. Meanwhile, meticulously clean both bowl & beaters for kitchenaid.
In a small sauce pan, put in listed sugar & water stir to combine, cover with a tight fitting lid & bring to a boil as soon as it comes to a boil remove lid insert a candy thermometer & cook syrup until it reaches 243f. Meanwhile, place egg whites in the mixer with cream of tarter & a pinch of salt, start out on a slow speed just to combine then turn to high & beat until soft peaks form, then very slowly add 1/3 cup of super fine sugar (this is not in the recipe from my instructional baking book but it is in the tutorial & I believe it adds further structure to the meringue).
Ideally, your egg whites should form soft peaks right around the same time that your syrup reaches the optimal 243f. With mixing going, in a very slow but steady stream add hot syrup, taking 1-2 minutes to do so. Continue to beat on high until the meringue is completely cool. Test by dipping in a finger & touching the side of the bowl. If you have made a successful meringue, it should be shiny & elastic clinging to the beaters in stiff peaks.
With the mixing running, add butter slowly. 1 Tbsp. at a time, not adding another piece until each is fully incorporated. Whip until creamy & smooth then add vanilla. Cover & store in the fridge until ready to use but bring back to room temperature before using.
2.) Assemble & frost cake layers. (Fully explained & illustrated below.)
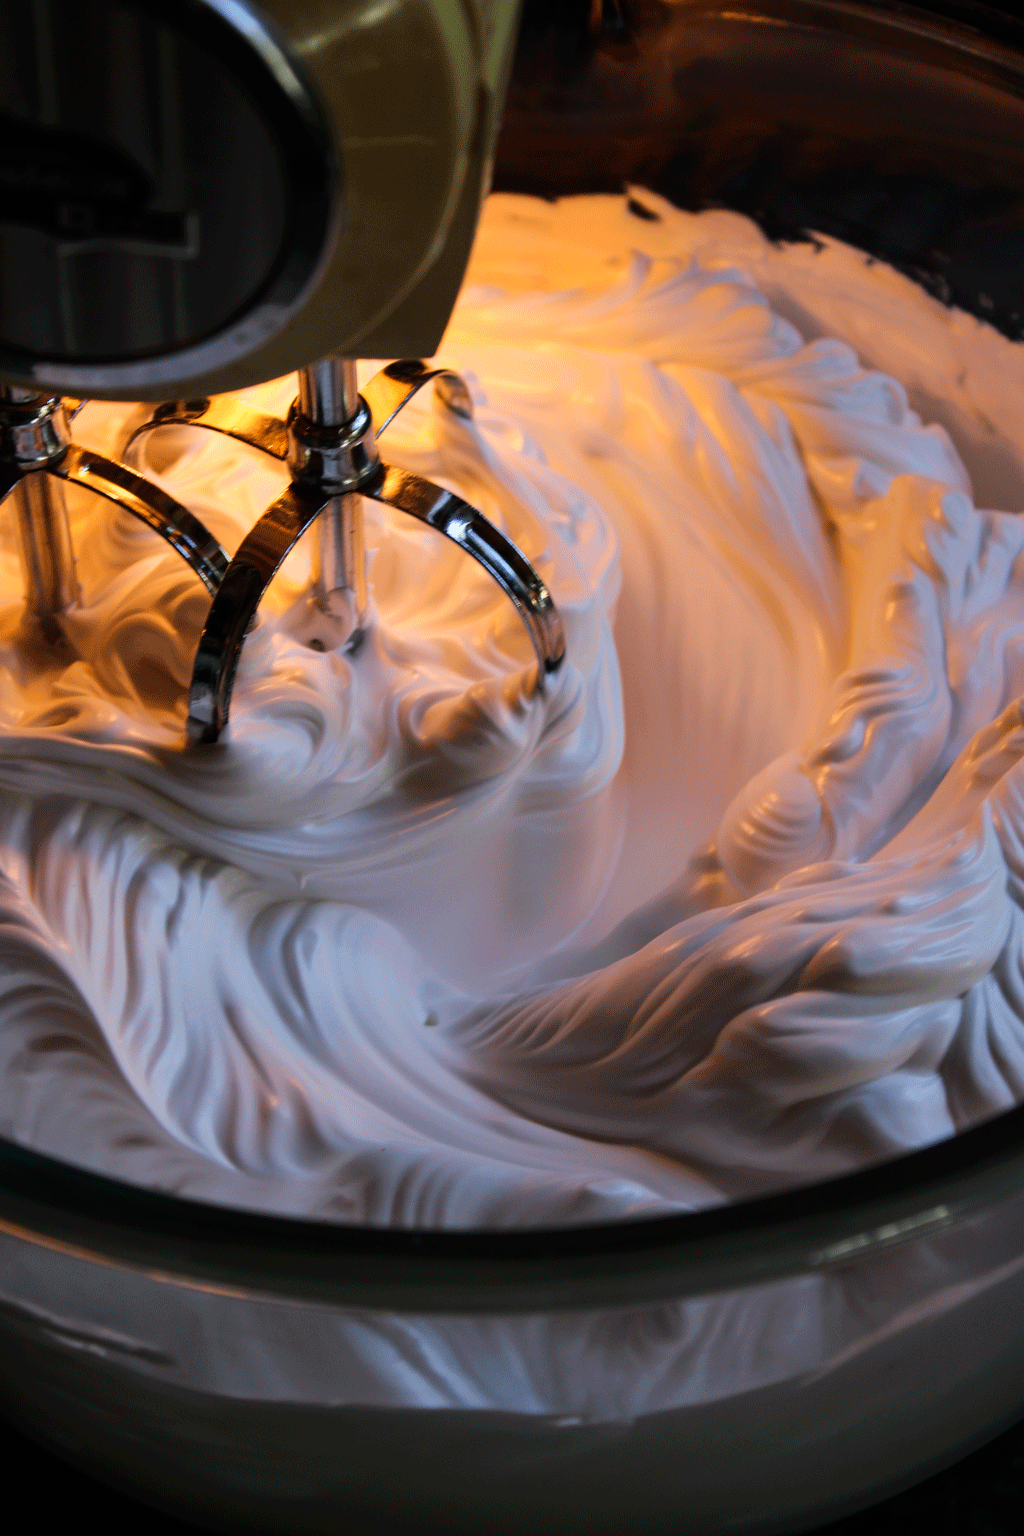

Italian meringue buttercream. By far the fairest in all of the land in the world of buttercreams. It is silken, just sweet enough perfection, not overtly sweet like an American buttercream & it’s a dream to work with. Lovely to pipe & to create perfectly smooth crisp edges on the finished cake. However, it is temperamental & does require a certain finesse.
You are actually making a meringue first (first illustration above) & then creating a buttercream emulsification (second illustration above). I had two failed attempts at the meringue itself then two more failed attempts with the buttercream emulsion, that means it took five (that’s right, five) attempts for me to achieve a perfect Italian buttercream. So that you do not have to experience my anguish & waste of butter & egg whites, I am including the link to the tutorial I used to achieve meringue nirvana.
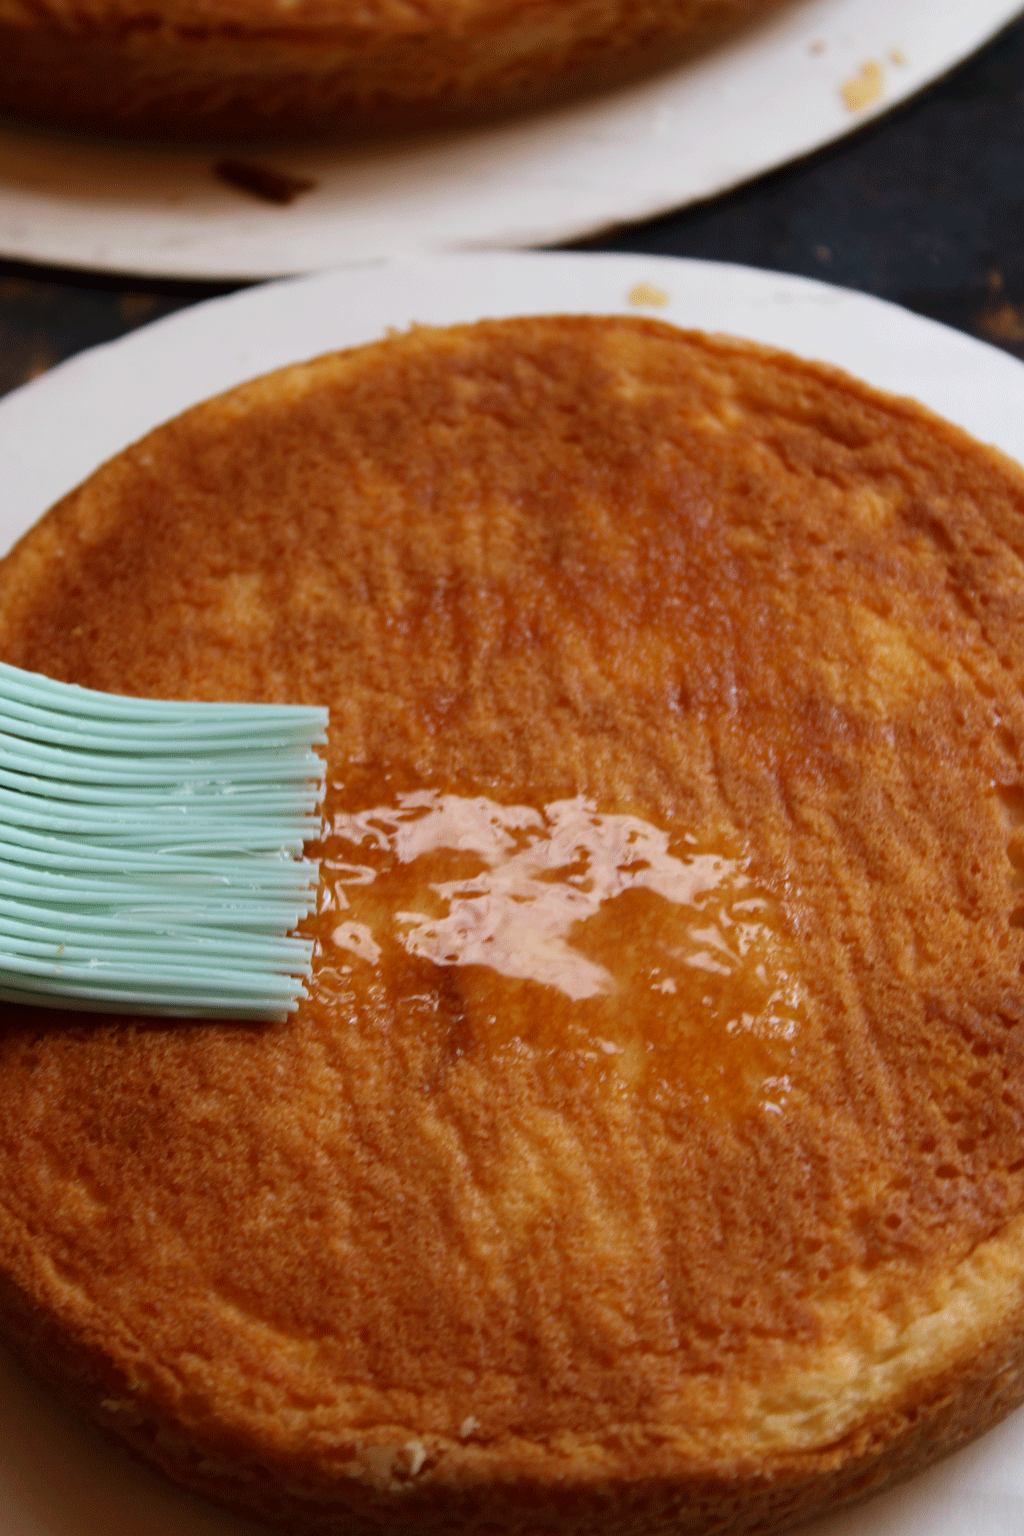

Dessert syrup. Using a pastry brush, coat all sides of the cake layers with dessert syrup brushing off excess crumbs in the process. This ensures moist cake layers while adding another level of complexity.
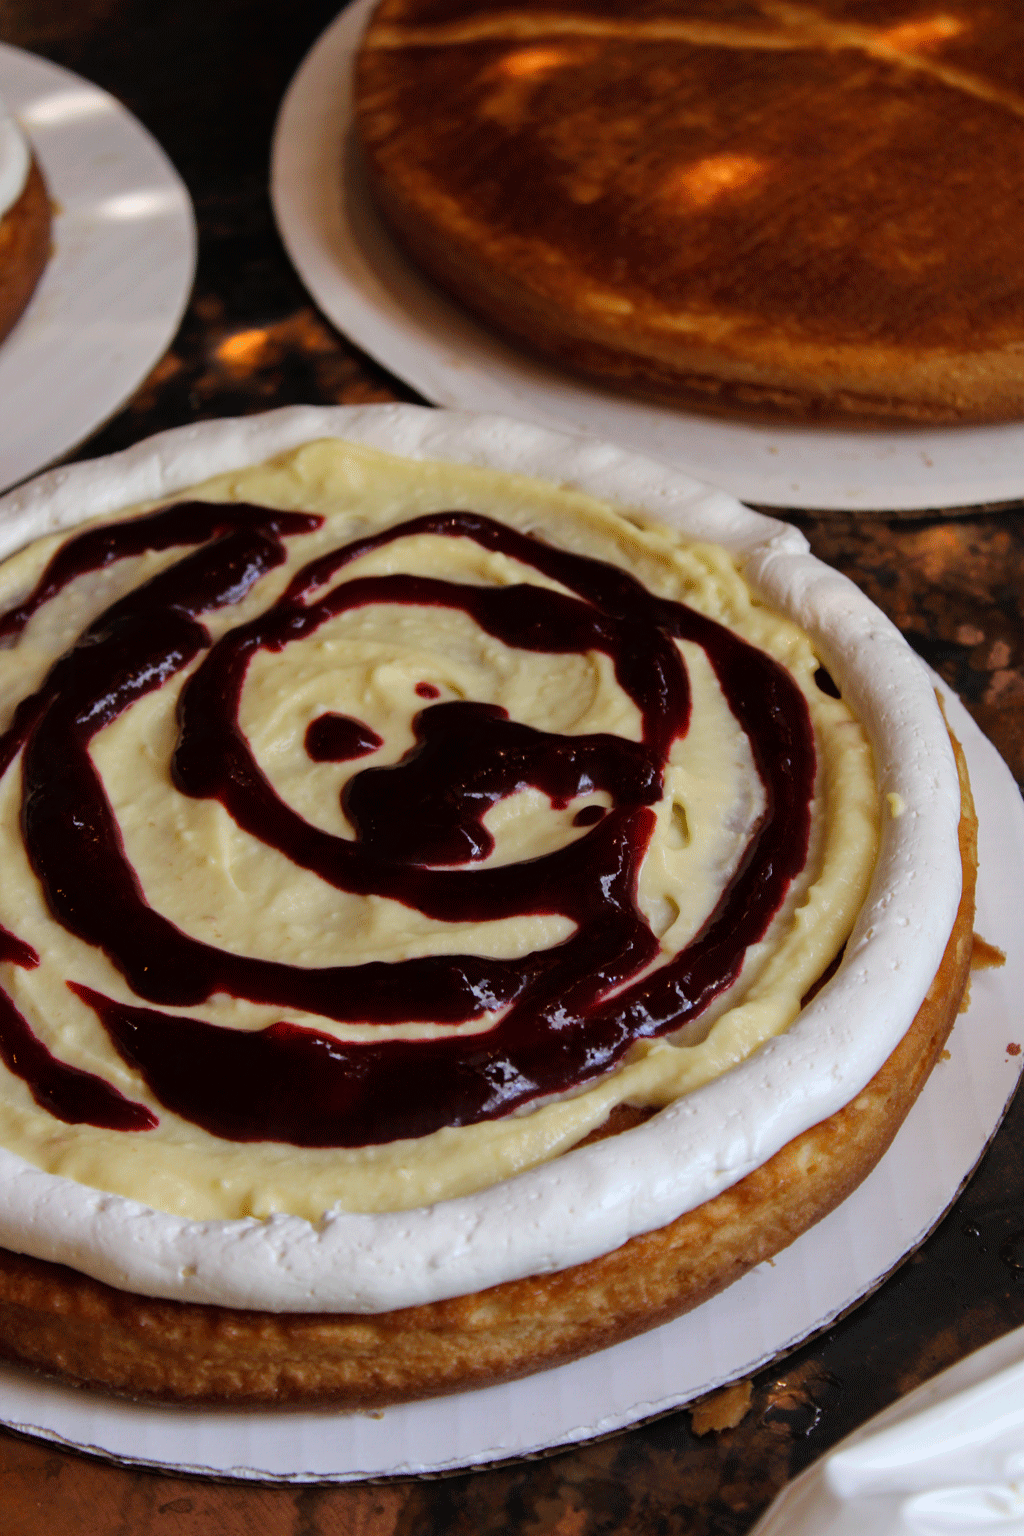
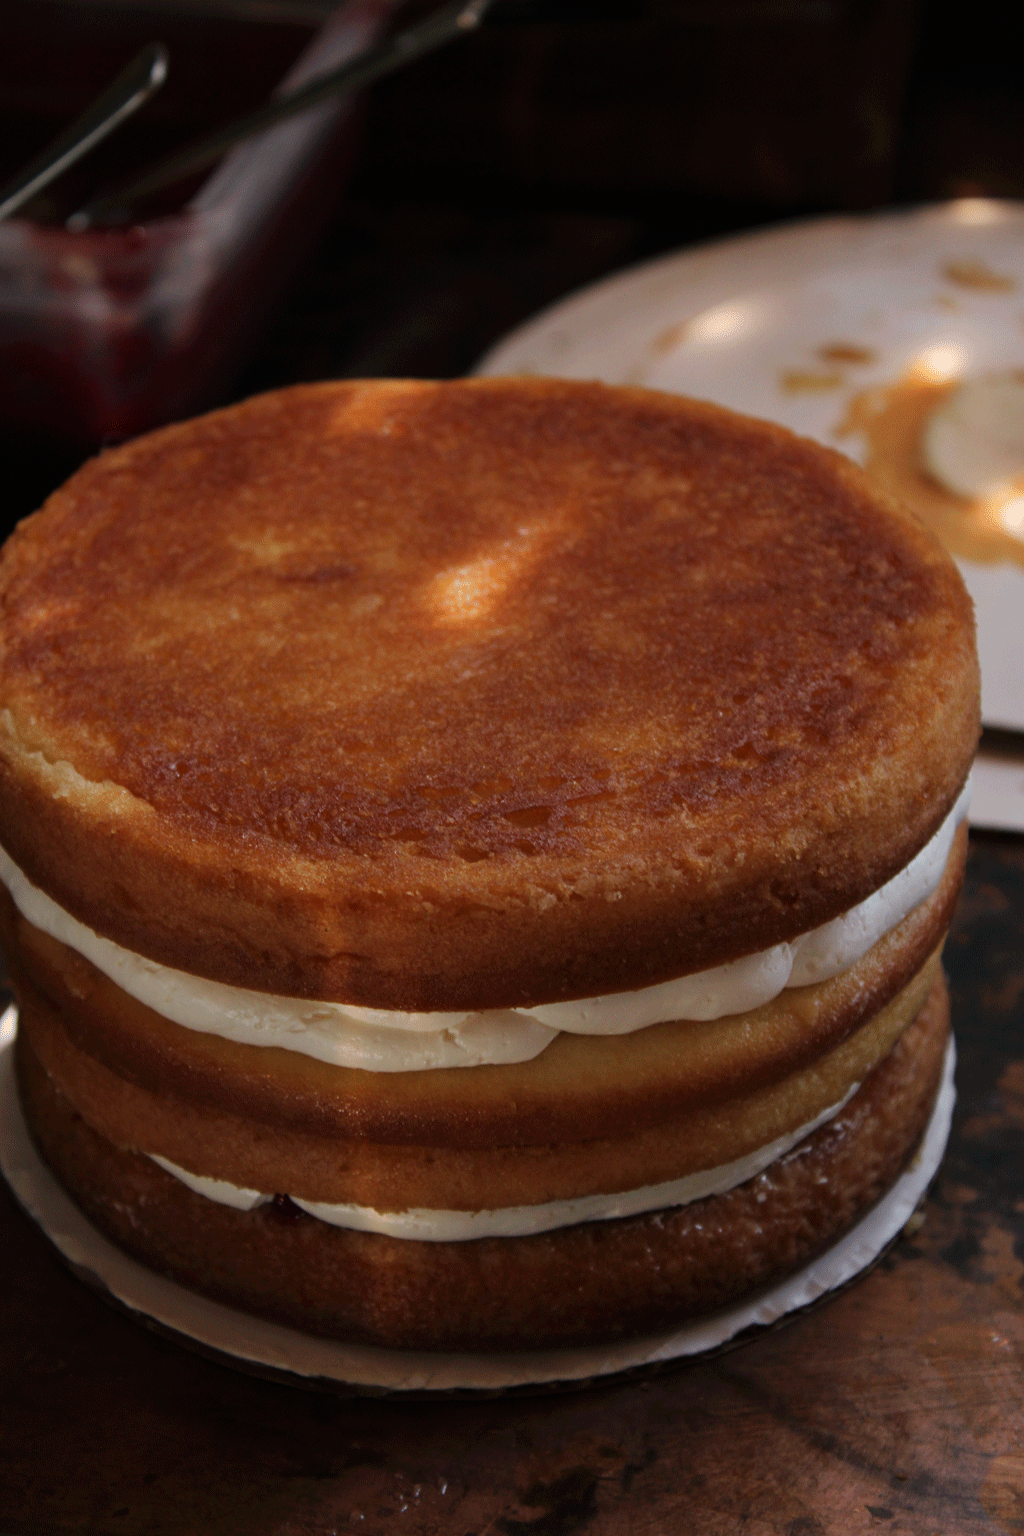
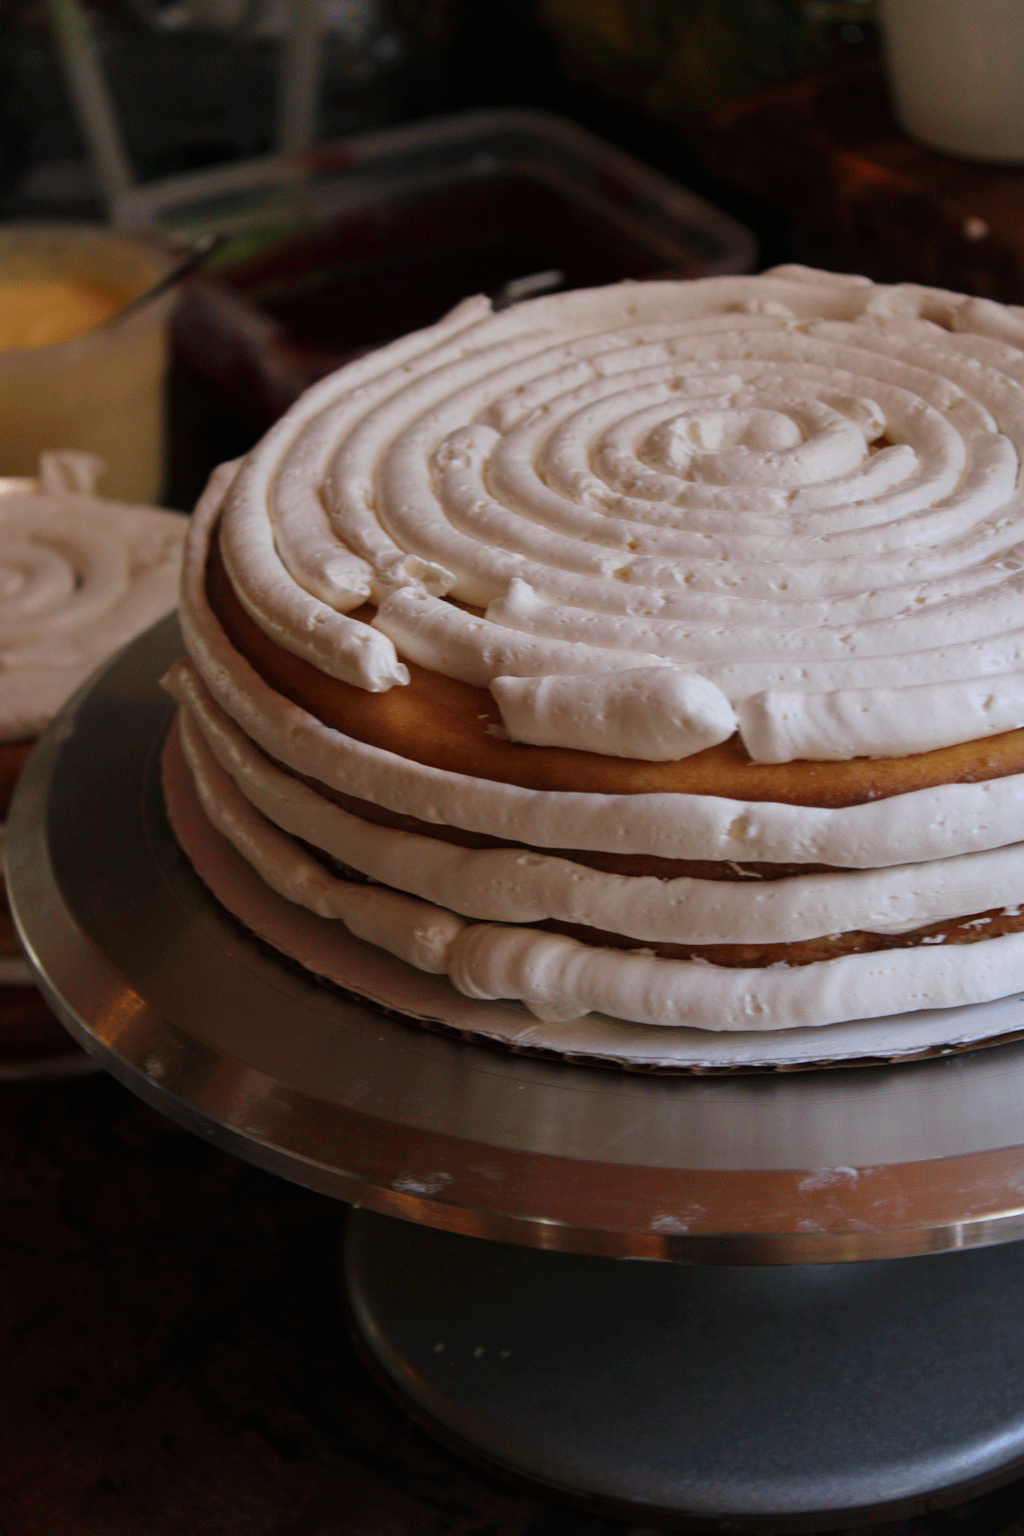
Using a large round diameter tip, pipe a rope of buttercream on the outer edge of each cake layer, less 1 of each size, this will be the top of the layer. Then fill in with pastry cream & raspberry coulis. Place another layer on top with the flattest side facing up.
Repeat with layers finishing with the last top layer; flattest surface facing upward.
Using the same tip, pipe in a circular pattern on cake top then pipe around the edges.
Crumb Coat. A crumb coat is a thin, initial coat of buttercream or frosting that serves as a smooth foundation for the final layer buttercream. Smooth out buttercream using a cake spatula, removing excess in the process (reserve for final coat as long as it is crumb free). Cover with plastic wrap & refrigerate for at least 30 minutes before proceeding or up to over night.
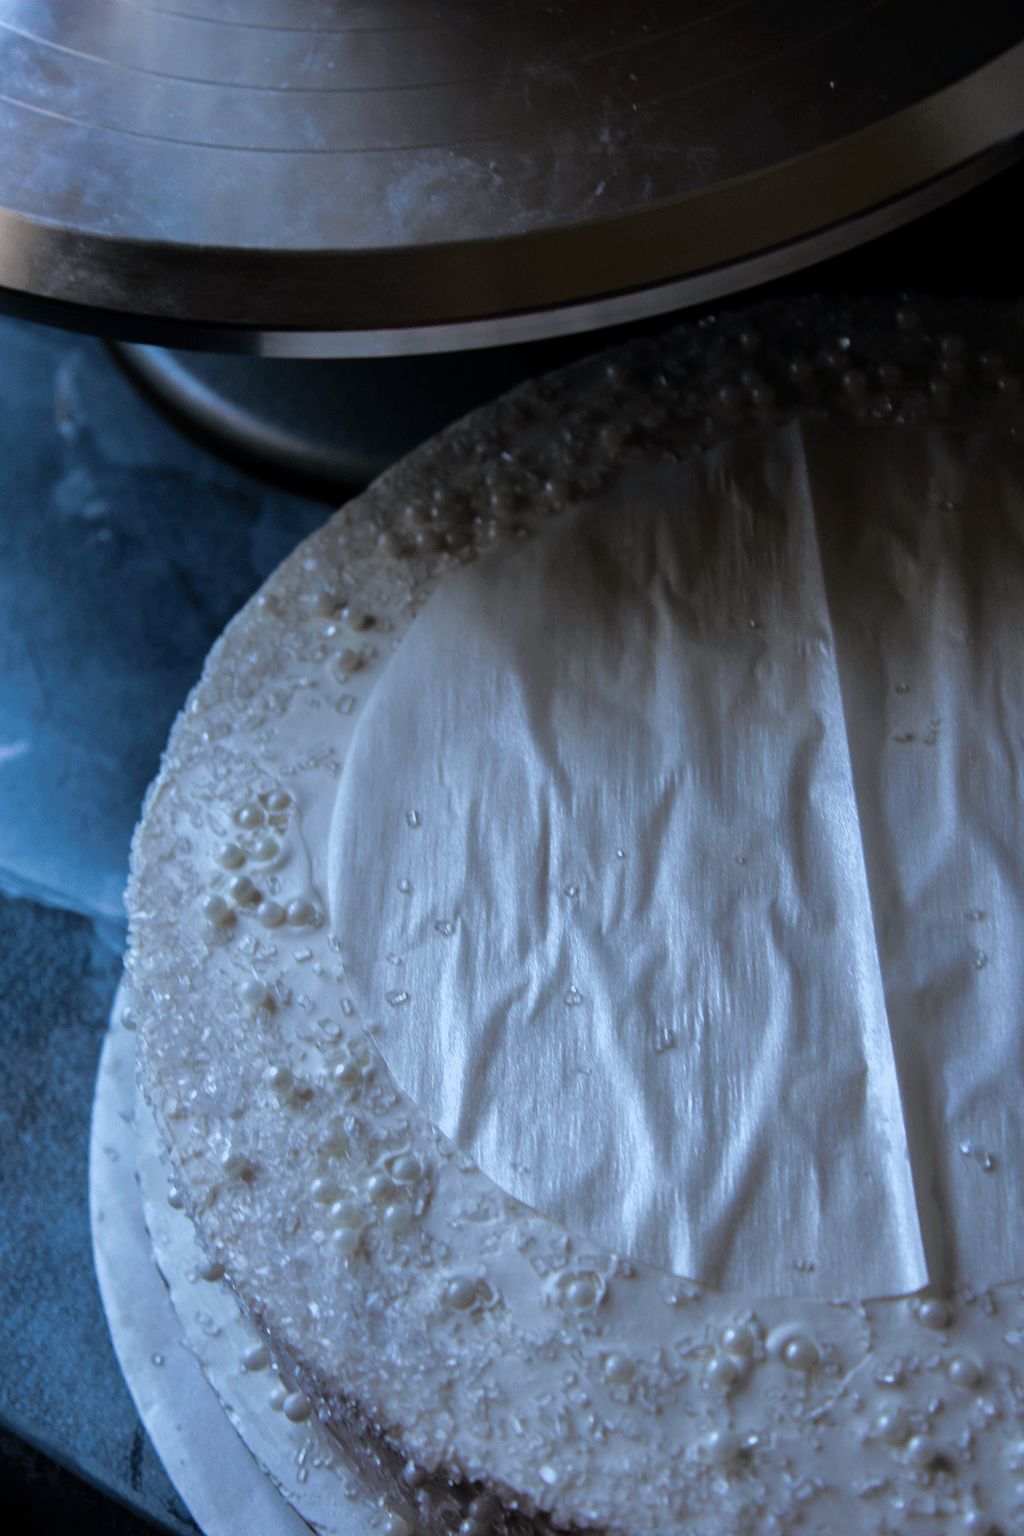
Apply final layer of buttercream using the same method as for the crumb coat only this one will be a bit thicker. Smooth side of cake using a bench scrapper, then smooth out the top using a combination of the bench scrapper & a bakers spatula. You may decorate the bottom layer at this point. Place a round piece of parchment paper in the center of the bottom cake tier the diameter of the top cake tier. You want this surface smooth for the placement of the top tier. Decorate with candy pearls & sanding sugar. This time allow your buttercream to set up for a bit in the fridge before placing plastic wrap over it.
day 4- designing the top tier & final assemblage of cake.
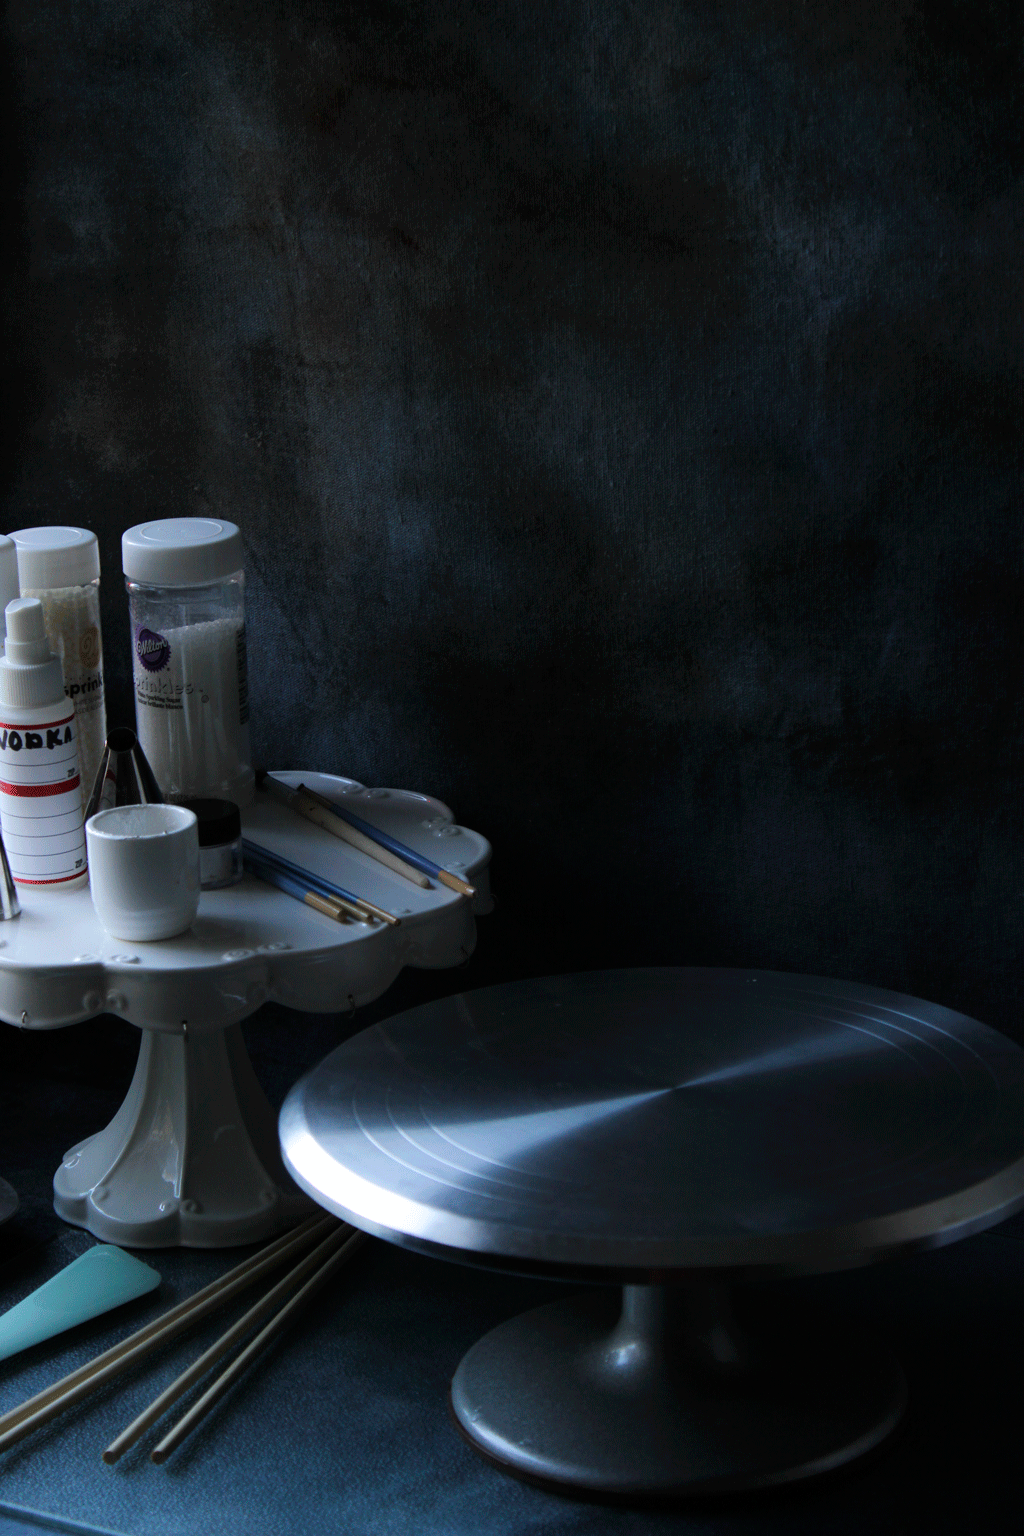


Gathering up your mise en place. You will need a turning cake stand, rice paper, vodka in a small spritz bottle, silver edible dust, a small dish or container, a & fine tip paint brush.
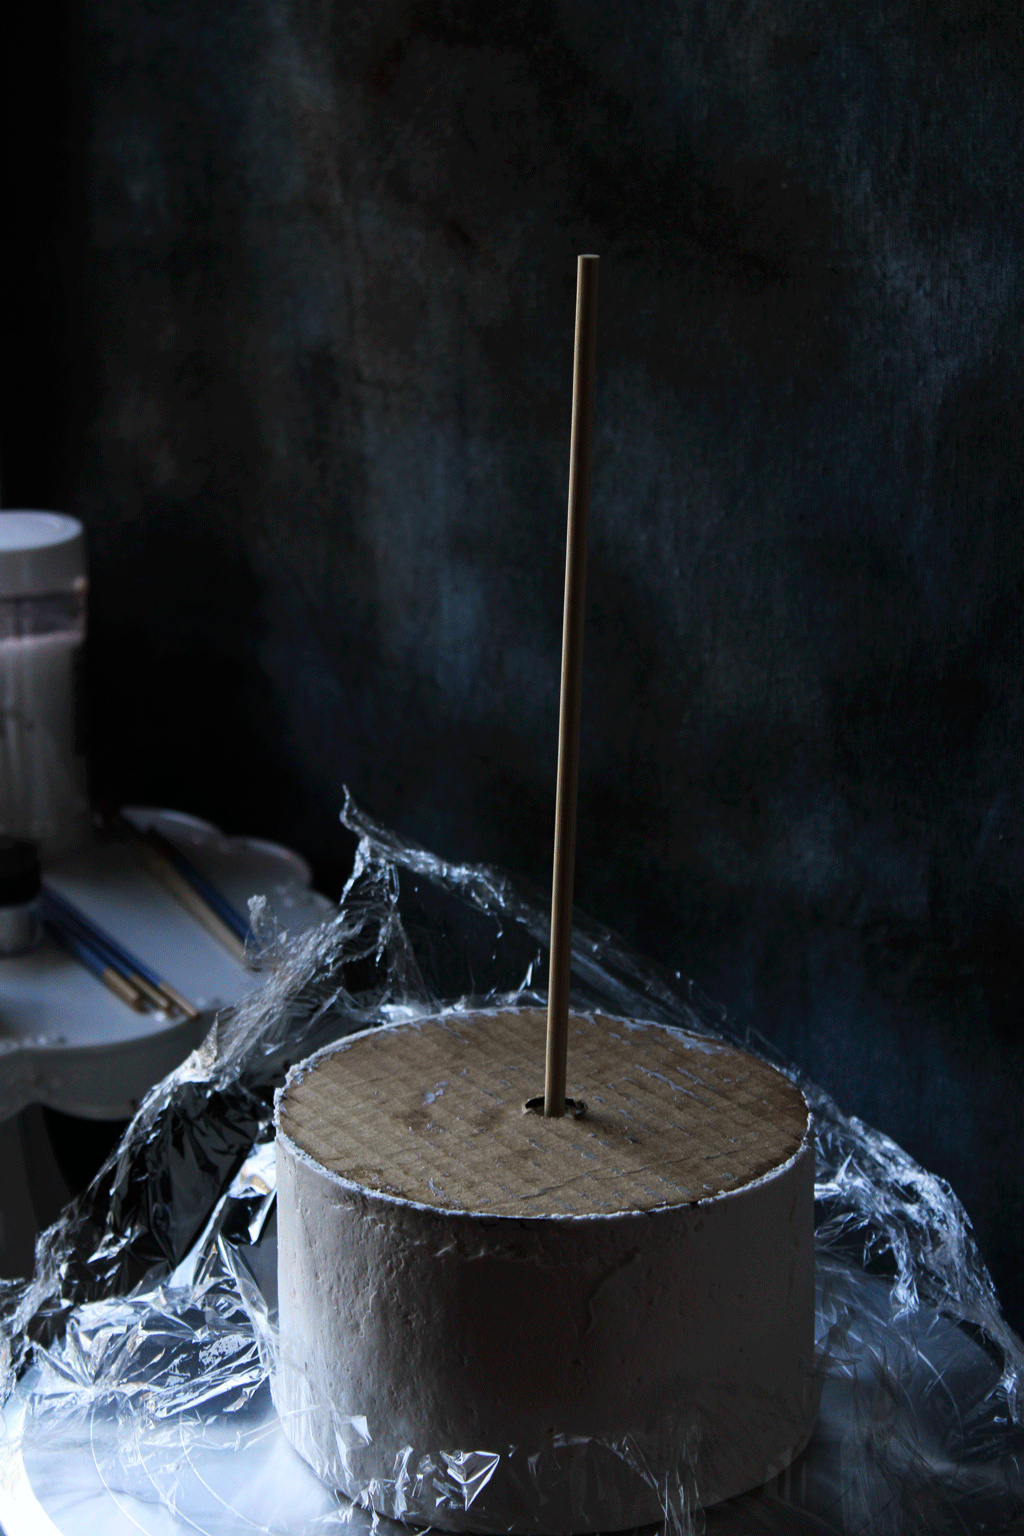
Remove top cake layer from the fridge. Flip the cake over onto its top. Remove the small circle from the center of your cake board & insert a 12” dowel into the center hole until you feel resistance ( you want it to pierce through all layers & reach the top but not pierce through the top). Remove the dowel & flip cake upright.
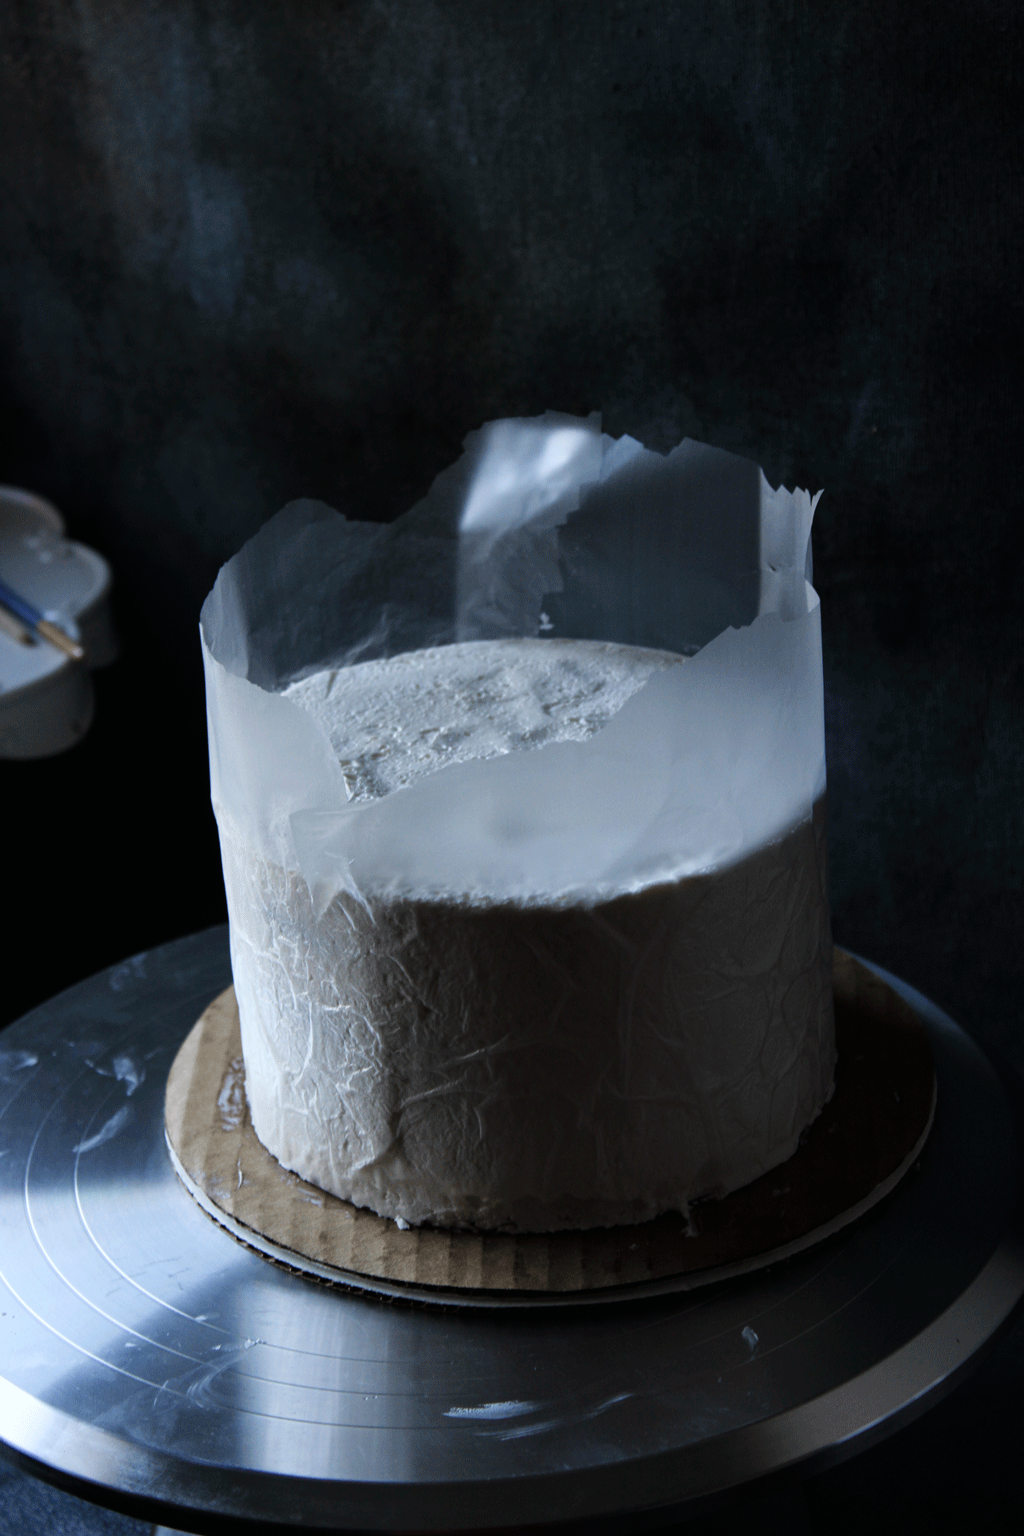
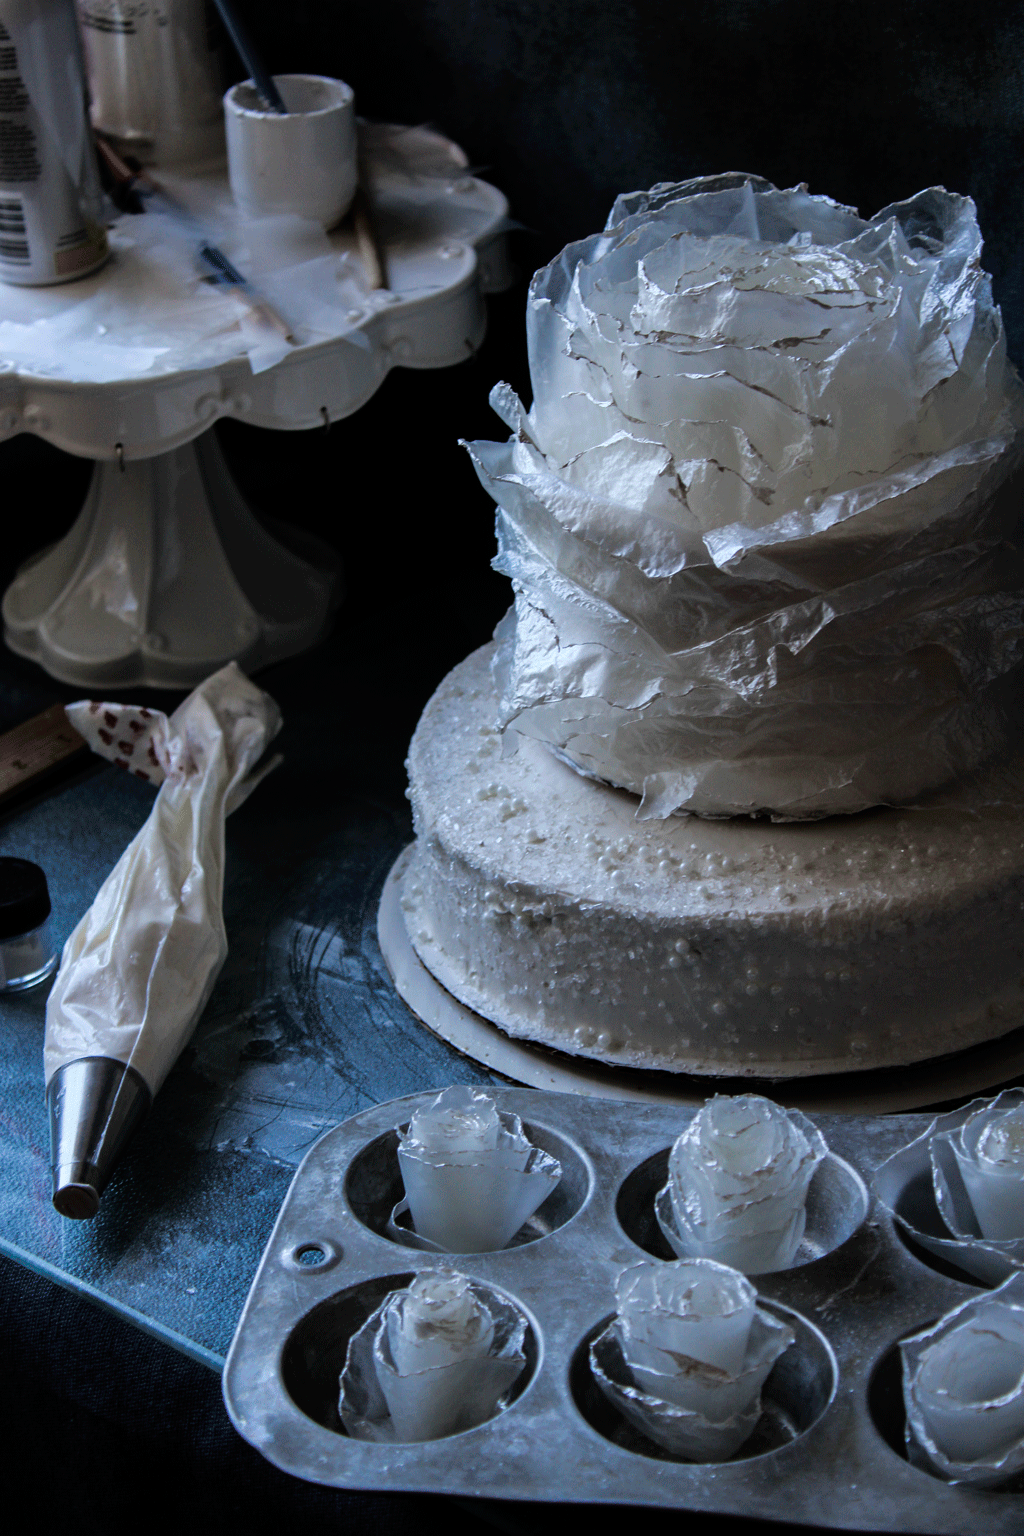
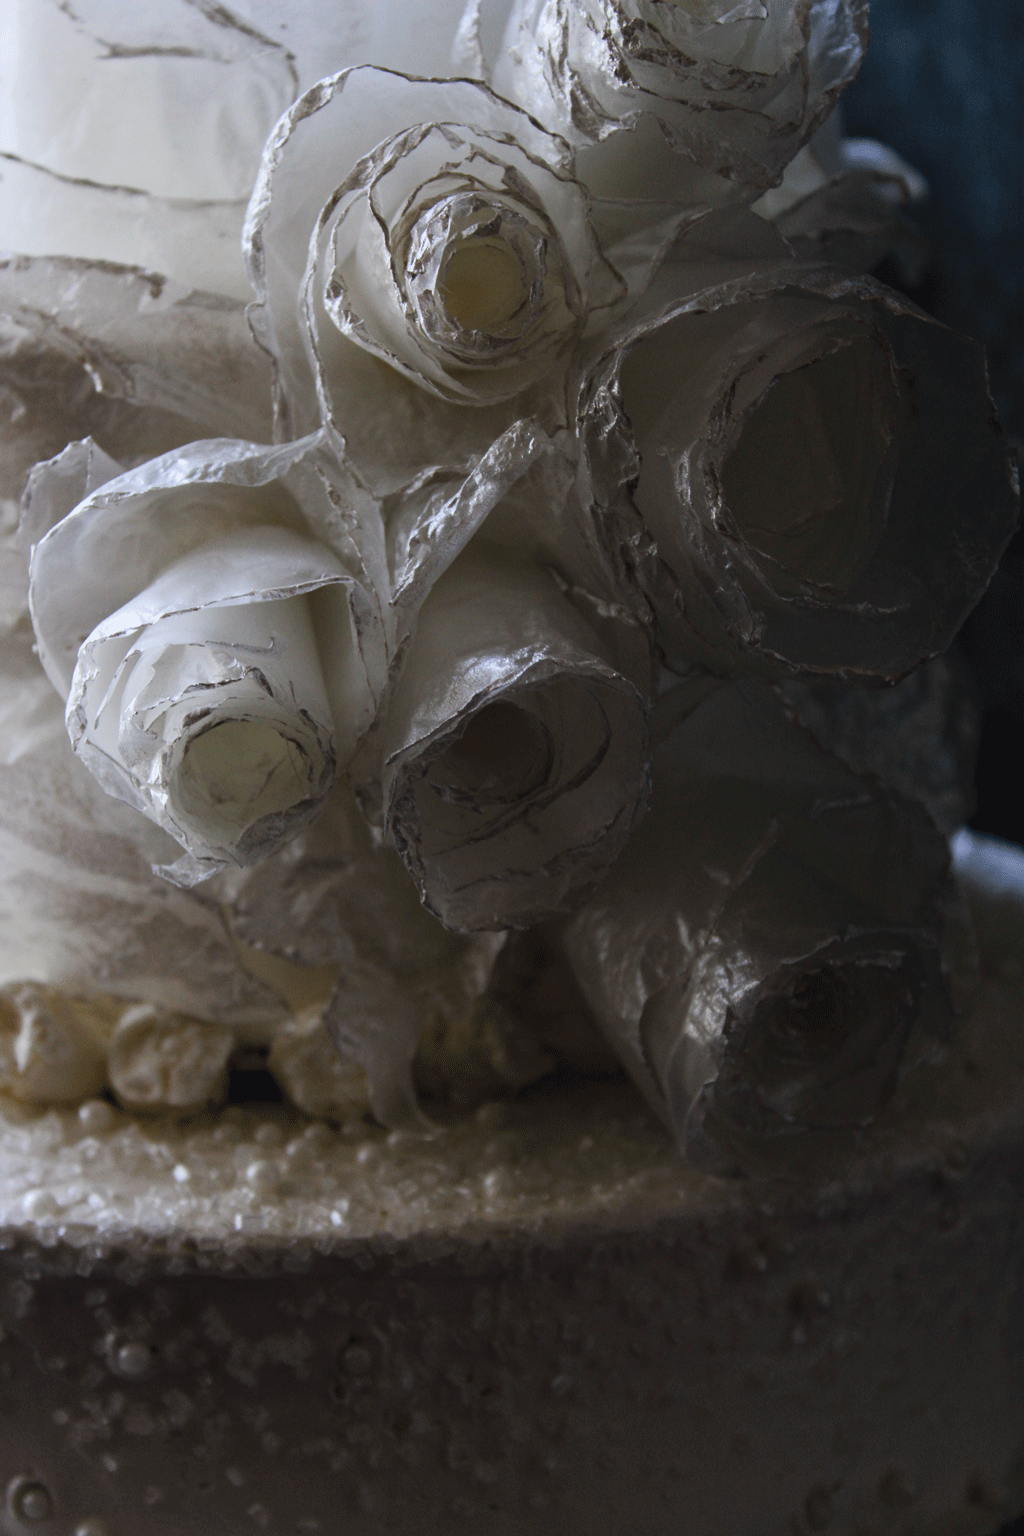
Apply your first layer of rice paper to the sides of the cake pressing gently into the buttercream to adhere. Spritz edges with a bit of vodka & press edges together. Tear rice paper down to 2 1/2” from the top of the cake.
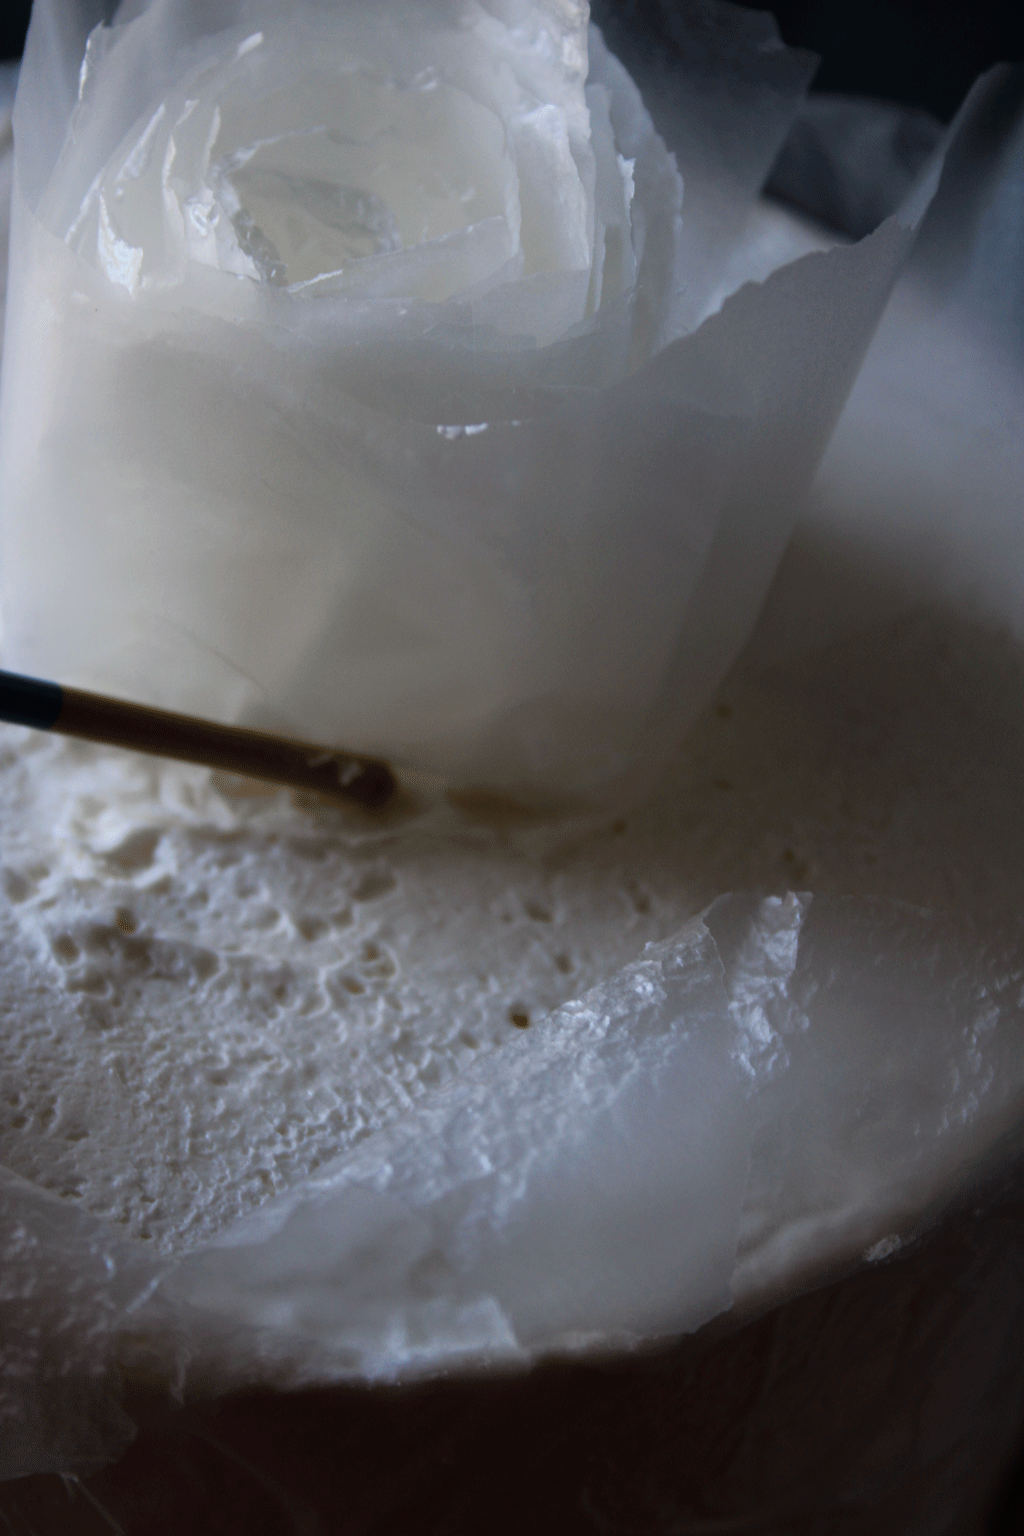
Begin forming the rose in the center of the cake. Tear 2 pieces of rice paper lengthwise into 5 strips. Role one strip up like a tight cigar & place in the center of the top of the cake, allow it to unfurl a bit into a rose bud, then press down into buttercream, spritz edge of paper with a small amount of vodka. In the tutorial, the rice paper she uses is actually formed from potato starch & appears much studier than the product I used which is actual rice paper. I found that I had to press the edges of the paper into the buttercream using the tip of a paint brush. You will see this technic in the fourth illustration above.
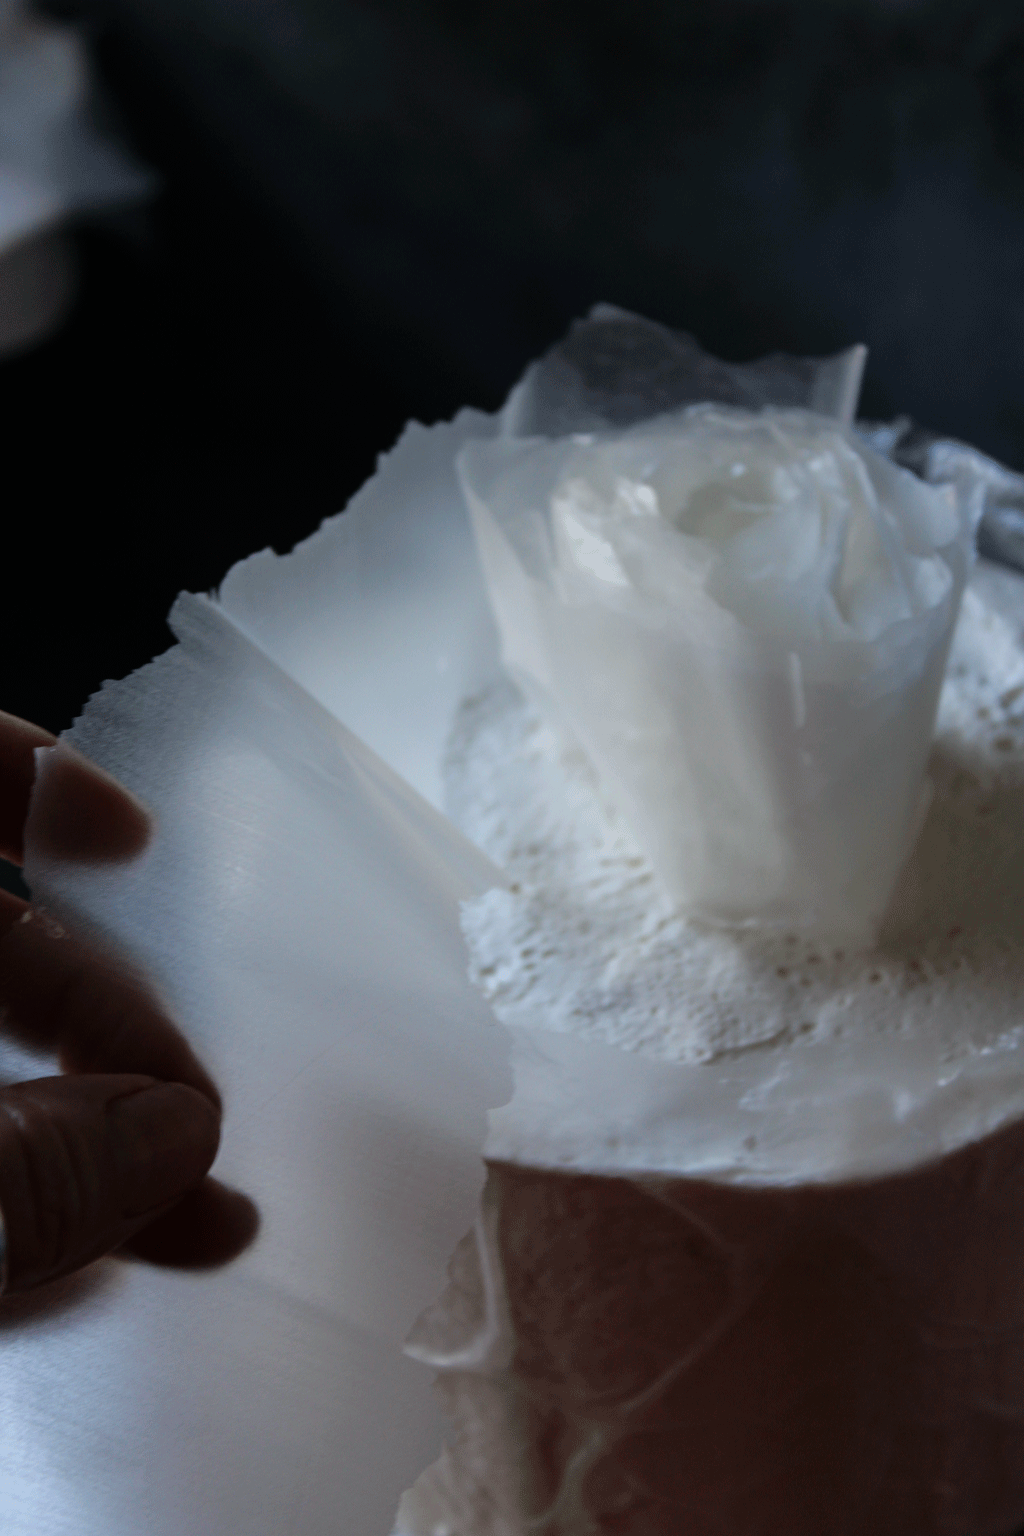
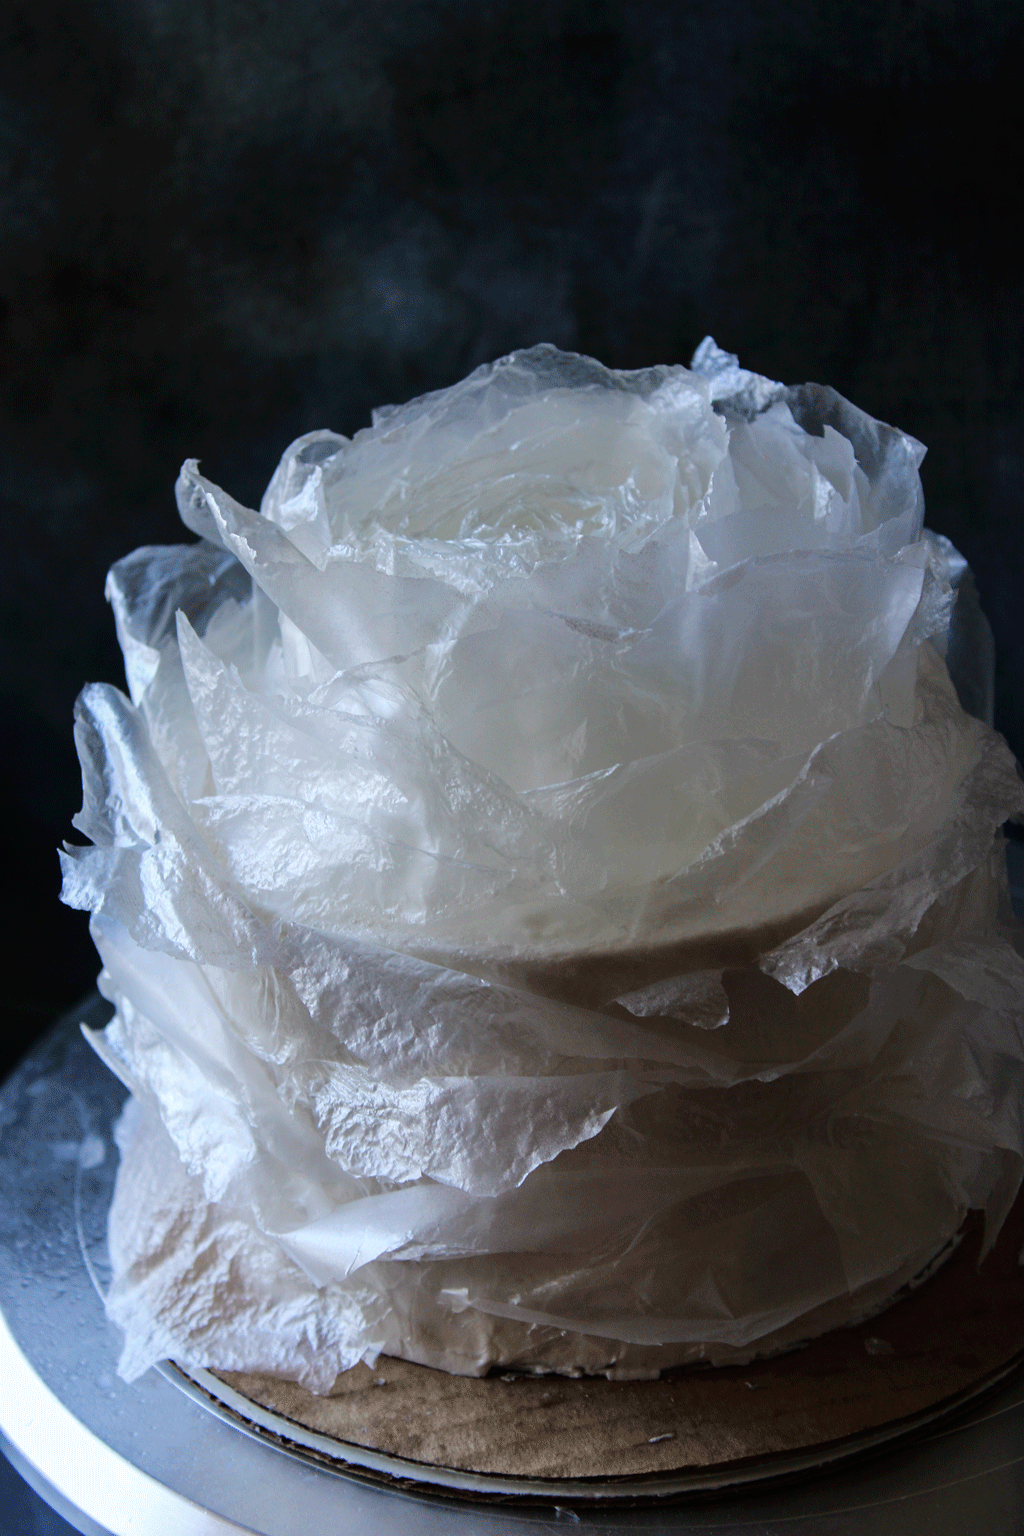
Begin the next layer of your rose only roll it looser so that it will fit around the center. Continue layers until you have a full rose that reaches the edge.
Now build the outer petals down the side of the cake, starting from the top. I highly suggest that you watch the tutorial as this is difficult to explain, you really need a visual.
In a small dish, sprinkle just a little bit of the edible powder (a tsp. or so) then add a little bit of vodka at a time, mixing with you fine tip paint brush until its the consistency & is creamy. Brush just the edges of all of your petals. This is what gives true definition to your rose & makes all of the layers pop out.
Inserting Supports | Final Assemblage.
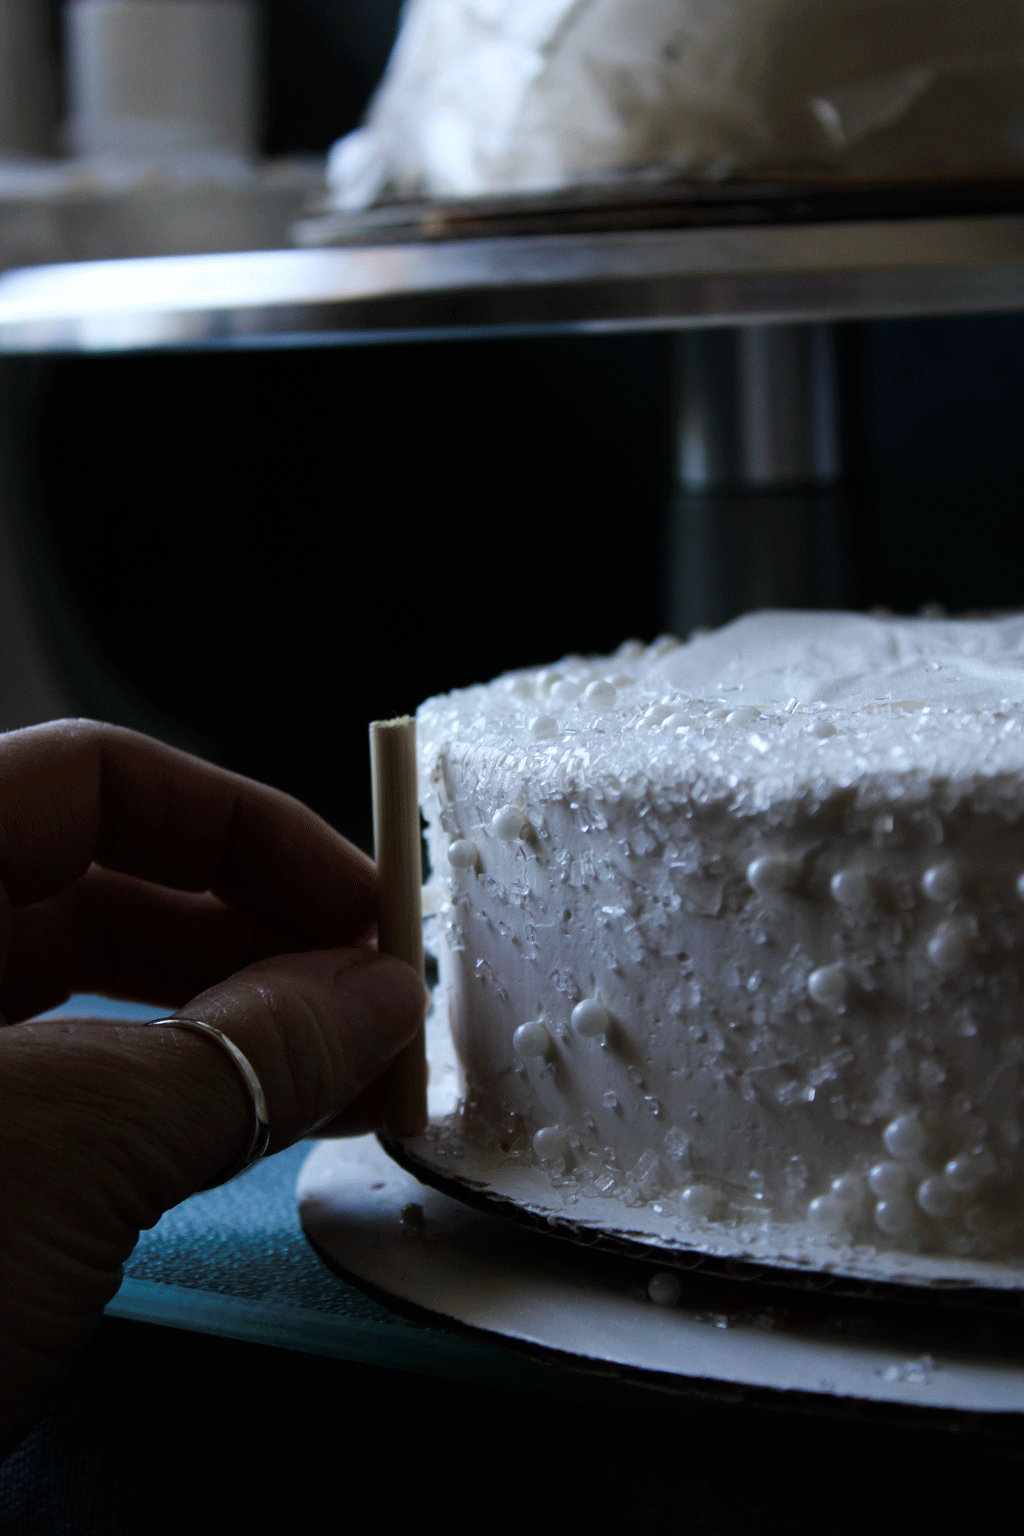

Measure 4-5 supports for the bottom cake tier; measuring from the bottom to top of the of the frosting. Use 12” wooden cake dowels cut down to size, marking with a pencil & cutting around the diameter with an exacto knife, then simply snap at the cut line. In this case we measured 3- 2” supports to form a triangle inside the marked area (this is where your parchment circle was) then 1 longer length for the very center of the cake as illustrated above (if this was a larger cake or if it had more than two cake tiers, you would use 5 supports).
Now slide the top tier down onto that center dowel, this will keep your cake layers sturdy.
Pipe a beading of buttercream along the edge in between the two cake tiers, brining them together into one harmoneous piece & coving the cake board. Do the same to the very bottom layer (I missed this).
Do your final decorating with the placement of the individual roses by spritzing on a bit of vodka onto the base of rose & pressing into place, hold for a few seconds for it to set before adding the nest one.

Plating.


The acrylic plates we used for serving the cake were specially designed with a notched out corner that holds a glass of champagne.
Excess raspberry coulis was put in a squeeze bottle & used for dessert syrup. It made for a vivid presentation.
Last minutes guest were added so we opted to make cupcakes using the same white cake batter above with a meringue top finished with a min blow torch.